PfSense Web Filter – Filter HTTP(S) with SquidGuard
» Click here to check out our new guide! «
» PfSense web filter with pfBlockerNG – Check out our new guide! «
As the system administrator of a school, you are constantly faced with the question of how far you should filter content from the Internet. This question must be answered wherever children and young people have access to the Internet, whether in schools, clubs, libraries, at home or any other public institution. Opinions on this subject are very diverse. There is no 100% protection. It is much more important to teach children and young people how to use the Internet responsibly. This is a very big challenge and takes time. Parents and educators are faced with this task and often do not know how best to approach it. Especially in schools, where you can’t always keep an eye on the screens, a web filter is a great help. In some countries, a web filter for schools is even required by law. But sometimes it’s just about blocking certain websites, such as Facebook, Netflix & Co. Therefore, in this tutorial I would like to show you how to set up a pfSense web filter.
No time to read this article now?
Preliminary Remarks
pfSense is a widely used open source firewall that we use at our school. (If you need help to install pfSense, check out our install guide). With the help of Squid (a proxy server) and SquidGuard (the actual web filter) we want to filter HTTP and HTTPS connections. For this tutorial we first need an active pfSense installation. The firewall can be downloaded here and installed according to these instructions.
How it works
Filtering HTTP connections is very easy and quick to set up. Since these connections are unencrypted, it is possible to examine them well and therefore block them completely or partially. Nowadays, more and more websites (even those you would like to block) use HTTPS, i. e. an encrypted connection between the user’s browser and the web server. Thanks to Let’s Encrypt, anyone can now set up a free certificate for their website. This is a good thing in itself, because it increases security and makes many attacks impossible or more difficult. However, it also makes filtering for unwanted content more difficult.
This “problem” can be solved in two ways:
1. man-in-the-middle attack
One way is a conscious man-in-the-middle attack. The proxy server decrypts the HTTPS connection and rebuilds it. This allows them to view the connection and filter it accordingly. This concept is used by most web filter solution providers. The problem here is that this profound interference with the HTTPS connection means that the actual security provided by HTTPS is no longer guaranteed. A user can hardly recognize the difference if the certificate of the proxy server is trusted. But this security is deceptive. Even if this is the only way to speak of true content filtering, this solution is dangerous, very risky (implementation is not trival) and, depending on the country, incompatible with the prevailing laws (keyword data protection and privacy). Therefore, this route is not recommended for safety and moral reasons.
2. URL filter via SNI
Another possibility is filtering via SNI (Server Name Indication). Before the certificate is queried between browser and web server and thus an encrypted connection is established, the browser sends the domain name (FQDN) that it wants to query. This part is not yet encrypted and can therefore be read by a (transparent) proxy and used for filtering. The following figure illustrates the TLS handshake.
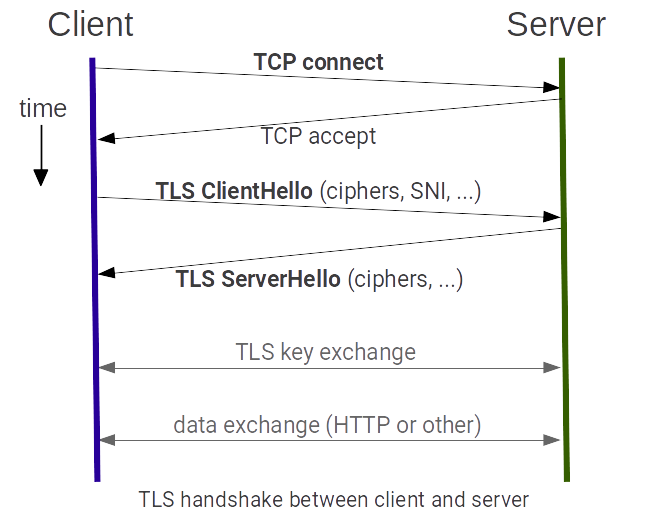
You can easily see that the SNI is sent before the key exchange and the actual secure connection. We take advantage of this principle and in addition to the web filter for HTTP connections, we can also set up a URL filter for HTTPS connections without destroying HTTPS by a man-in-the-middle attack.
Safe-Search for search engines
Create firewall rules for DNS
Since we can’t look into an HTTPS connection, unwanted images and videos may appear in a Google search, for example. Google and other search engines therefore offer a secure mode (Safe-Search) because we want to force it.
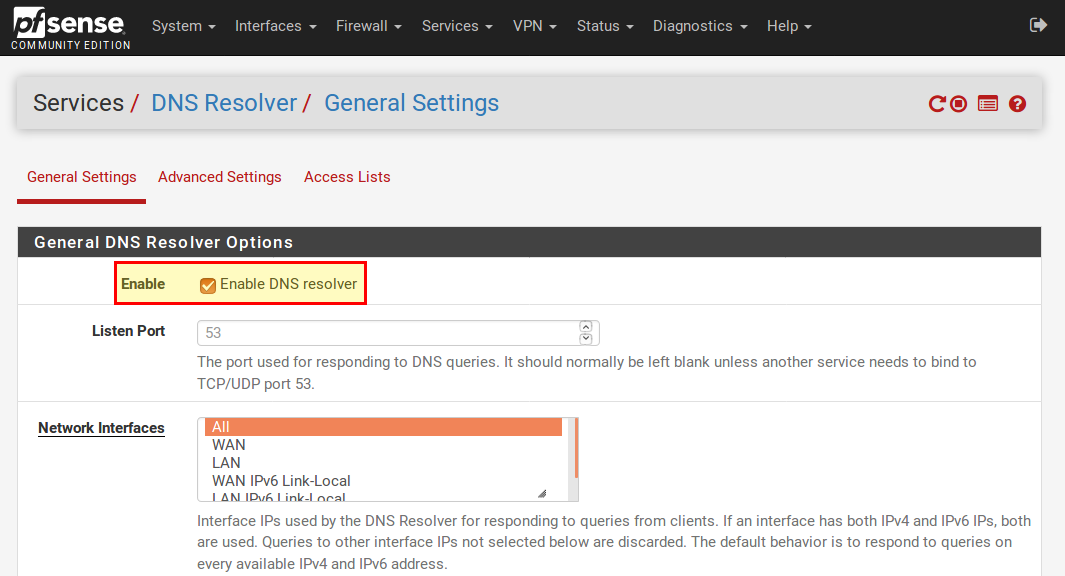
First we have to activate the DNS resolver in pfSense (under Services → DNS Resolver) and then save and apply the changes.
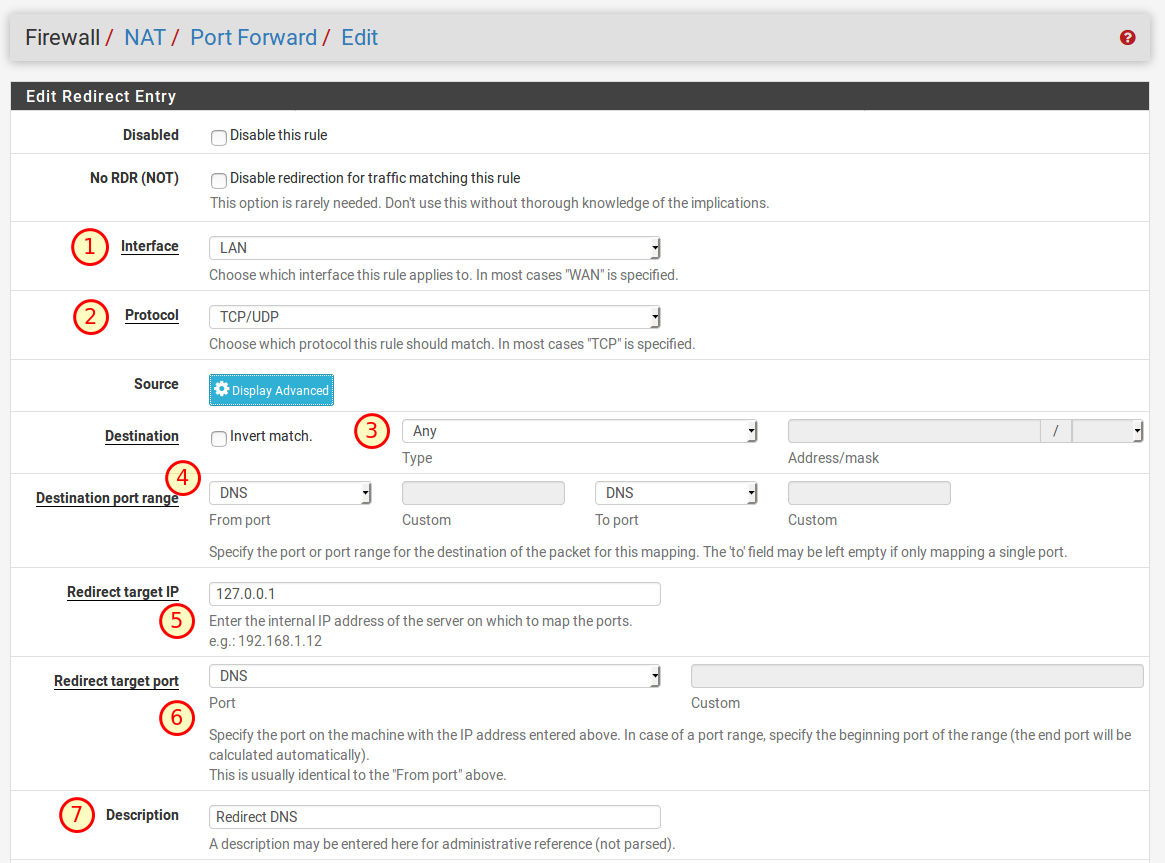
In order for the computers in the network to use the DNS server of the firewall, we need a rule that forwards all other DNS requests to the firewall. To do this, we create a new rule under Firewall → NAT in the Port Forward tab with a click on one of the two add buttons. We enter the following:
- Interface: LAN
- Protocol: TCP/UDP
- Destination: Any
- Destination Port Range: DNS (53)
- Redirect Traget IP: 127.0.0.1
- Redirect Target Port: DNS (53)
- Description: Can be freely selected
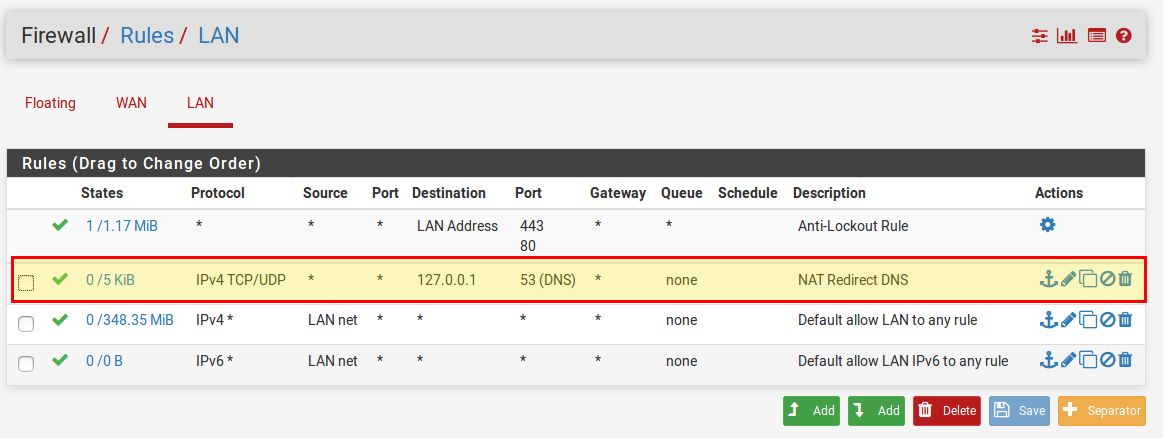
Now we have to make sure that our newly created firewall rule is in the right place. It must be above the default “Default allow LAN to any rule“! To do this, we open the firewall rules under Firewall → Rules and move the rule up. Then save with Save and Apply to apply the changes.
Host Overrides for Bing and Youtube
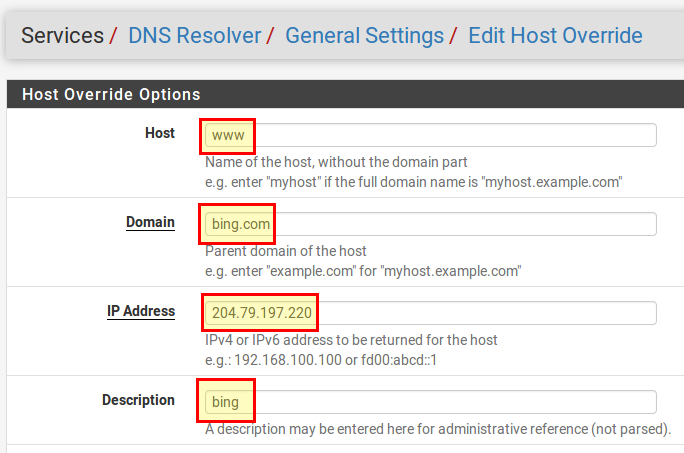
Next, we’ll create some DNS entries to make sure that their safe search is used for both Google and Bing. To do this, we open the DNS Resolver again under Services → DNS Resolver and add the following entries in the section Host Overrides below.
Bing:
- Host: www
- Domain: bing. com
- IP Address: 204.79.197.220
- Description: Bing
- Then save with Save
Then the entry for Youtube:
- Host: www
- Domain: youtube. com
- IP Address: 216.239.38.120
- Description: Youtube
- Save again with Save
Now apply the changes again with Apply.
Host Overrides for Google
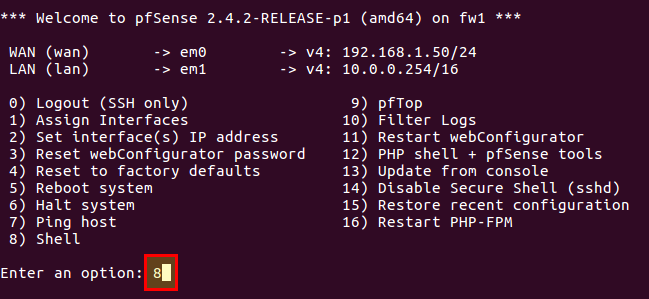
Google uses a lot of different domains and it would take quite a long time to enter them manually. That’s why we choose a different way for Google. First, we need to log in to pfSense via SSH (or connect a screen + keyboard if the pfSense is installed on a computer with a graphics card). SSH must first be enabled in the web interface and System → Advanced in the Secure Shell section.

Now we can log in with the following command via SSH (adjust IP address!):
$ ssh [email protected]
In the following menu we select “8” (Shell).
Now we create a file in which we later enter our DNS entries for Google. We can do that with the following order:
$ vi /var/unbound/google.conf
To exit the editor, we need to enter :wq (the colon is important!). That’s all we need to do on the command line.
We can now edit the newly created file using Diagnostics → Edit File. To do this, enter the path /var/unbound/google.conf and press Load.

Now we copy the following content into the file:
local-data: "www.google.ad A 216.239.38.120"
local-data: "www.google.ae A 216.239.38.120"
local-data: "www.google.com A 216.239.38.120"
local-data: "www.google.com.af A 216.239.38.120"
local-data: "www.google.com.ag A 216.239.38.120"
local-data: "www.google.com.ai A 216.239.38.120"
local-data: "www.google.al A 216.239.38.120"
local-data: "www.google.am A 216.239.38.120"
local-data: "www.google.co.ao A 216.239.38.120"
local-data: "www.google.com.ar A 216.239.38.120"
local-data: "www.google.as A 216.239.38.120"
local-data: "www.google.at A 216.239.38.120"
local-data: "www.google.com.au A 216.239.38.120"
local-data: "www.google.az A 216.239.38.120"
local-data: "www.google.ba A 216.239.38.120"
local-data: "www.google.com.bd A 216.239.38.120"
local-data: "www.google.be A 216.239.38.120"
local-data: "www.google.bf A 216.239.38.120"
local-data: "www.google.bg A 216.239.38.120"
local-data: "www.google.com.bh A 216.239.38.120"
local-data: "www.google.bi A 216.239.38.120"
local-data: "www.google.bj A 216.239.38.120"
local-data: "www.google.com.bn A 216.239.38.120"
local-data: "www.google.com.bo A 216.239.38.120"
local-data: "www.google.com.br A 216.239.38.120"
local-data: "www.google.bs A 216.239.38.120"
local-data: "www.google.bt A 216.239.38.120"
local-data: "www.google.co.bw A 216.239.38.120"
local-data: "www.google.by A 216.239.38.120"
local-data: "www.google.com.bz A 216.239.38.120"
local-data: "www.google.ca A 216.239.38.120"
local-data: "www.google.cd A 216.239.38.120"
local-data: "www.google.cf A 216.239.38.120"
local-data: "www.google.cg A 216.239.38.120"
local-data: "www.google.ch A 216.239.38.120"
local-data: "www.google.ci A 216.239.38.120"
local-data: "www.google.co.ck A 216.239.38.120"
local-data: "www.google.cl A 216.239.38.120"
local-data: "www.google.cm A 216.239.38.120"
local-data: "www.google.cn A 216.239.38.120"
local-data: "www.google.com.co A 216.239.38.120"
local-data: "www.google.co.cr A 216.239.38.120"
local-data: "www.google.com.cu A 216.239.38.120"
local-data: "www.google.cv A 216.239.38.120"
local-data: "www.google.com.cy A 216.239.38.120"
local-data: "www.google.cz A 216.239.38.120"
local-data: "www.google.de A 216.239.38.120"
local-data: "www.google.dj A 216.239.38.120"
local-data: "www.google.dk A 216.239.38.120"
local-data: "www.google.dm A 216.239.38.120"
local-data: "www.google.com.do A 216.239.38.120"
local-data: "www.google.dz A 216.239.38.120"
local-data: "www.google.com.ec A 216.239.38.120"
local-data: "www.google.ee A 216.239.38.120"
local-data: "www.google.com.eg A 216.239.38.120"
local-data: "www.google.com.et A 216.239.38.120"
local-data: "www.google.fi A 216.239.38.120"
local-data: "www.google.com.fj A 216.239.38.120"
local-data: "www.google.fm A 216.239.38.120"
local-data: "www.google.fr A 216.239.38.120"
local-data: "www.google.ga A 216.239.38.120"
local-data: "www.google.ge A 216.239.38.120"
local-data: "www.google.gg A 216.239.38.120"
local-data: "www.google.com.gh A 216.239.38.120"
local-data: "www.google.com.gi A 216.239.38.120"
local-data: "www.google.gl A 216.239.38.120"
local-data: "www.google.gm A 216.239.38.120"
local-data: "www.google.gp A 216.239.38.120"
local-data: "www.google.gr A 216.239.38.120"
local-data: "www.google.com.gt A 216.239.38.120"
local-data: "www.google.gy A 216.239.38.120"
local-data: "www.google.com.hk A 216.239.38.120"
local-data: "www.google.hn A 216.239.38.120"
local-data: "www.google.hr A 216.239.38.120"
local-data: "www.google.ht A 216.239.38.120"
local-data: "www.google.hu A 216.239.38.120"
local-data: "www.google.co.id A 216.239.38.120"
local-data: "www.google.ie A 216.239.38.120"
local-data: "www.google.co.il A 216.239.38.120"
local-data: "www.google.im A 216.239.38.120"
local-data: "www.google.co.in A 216.239.38.120"
local-data: "www.google.iq A 216.239.38.120"
local-data: "www.google.is A 216.239.38.120"
local-data: "www.google.it A 216.239.38.120"
local-data: "www.google.je A 216.239.38.120"
local-data: "www.google.com.jm A 216.239.38.120"
local-data: "www.google.jo A 216.239.38.120"
local-data: "www.google.co.jp A 216.239.38.120"
local-data: "www.google.co.ke A 216.239.38.120"
local-data: "www.google.com.kh A 216.239.38.120"
local-data: "www.google.ki A 216.239.38.120"
local-data: "www.google.kg A 216.239.38.120"
local-data: "www.google.co.kr A 216.239.38.120"
local-data: "www.google.com.kw A 216.239.38.120"
local-data: "www.google.kz A 216.239.38.120"
local-data: "www.google.la A 216.239.38.120"
local-data: "www.google.com.lb A 216.239.38.120"
local-data: "www.google.li A 216.239.38.120"
local-data: "www.google.lk A 216.239.38.120"
local-data: "www.google.co.ls A 216.239.38.120"
local-data: "www.google.lt A 216.239.38.120"
local-data: "www.google.lu A 216.239.38.120"
local-data: "www.google.lv A 216.239.38.120"
local-data: "www.google.com.ly A 216.239.38.120"
local-data: "www.google.co.ma A 216.239.38.120"
local-data: "www.google.md A 216.239.38.120"
local-data: "www.google.me A 216.239.38.120"
local-data: "www.google.mg A 216.239.38.120"
local-data: "www.google.mk A 216.239.38.120"
local-data: "www.google.ml A 216.239.38.120"
local-data: "www.google.com.mm A 216.239.38.120"
local-data: "www.google.mn A 216.239.38.120"
local-data: "www.google.ms A 216.239.38.120"
local-data: "www.google.com.mt A 216.239.38.120"
local-data: "www.google.mu A 216.239.38.120"
local-data: "www.google.mv A 216.239.38.120"
local-data: "www.google.mw A 216.239.38.120"
local-data: "www.google.com.mx A 216.239.38.120"
local-data: "www.google.com.my A 216.239.38.120"
local-data: "www.google.co.mz A 216.239.38.120"
local-data: "www.google.com.na A 216.239.38.120"
local-data: "www.google.com.nf A 216.239.38.120"
local-data: "www.google.com.ng A 216.239.38.120"
local-data: "www.google.com.ni A 216.239.38.120"
local-data: "www.google.ne A 216.239.38.120"
local-data: "www.google.nl A 216.239.38.120"
local-data: "www.google.no A 216.239.38.120"
local-data: "www.google.com.np A 216.239.38.120"
local-data: "www.google.nr A 216.239.38.120"
local-data: "www.google.nu A 216.239.38.120"
local-data: "www.google.co.nz A 216.239.38.120"
local-data: "www.google.com.om A 216.239.38.120"
local-data: "www.google.com.pa A 216.239.38.120"
local-data: "www.google.com.pe A 216.239.38.120"
local-data: "www.google.com.pg A 216.239.38.120"
local-data: "www.google.com.ph A 216.239.38.120"
local-data: "www.google.com.pk A 216.239.38.120"
local-data: "www.google.pl A 216.239.38.120"
local-data: "www.google.pn A 216.239.38.120"
local-data: "www.google.com.pr A 216.239.38.120"
local-data: "www.google.ps A 216.239.38.120"
local-data: "www.google.pt A 216.239.38.120"
local-data: "www.google.com.py A 216.239.38.120"
local-data: "www.google.com.qa A 216.239.38.120"
local-data: "www.google.ro A 216.239.38.120"
local-data: "www.google.ru A 216.239.38.120"
local-data: "www.google.rw A 216.239.38.120"
local-data: "www.google.com.sa A 216.239.38.120"
local-data: "www.google.com.sb A 216.239.38.120"
local-data: "www.google.sc A 216.239.38.120"
local-data: "www.google.se A 216.239.38.120"
local-data: "www.google.com.sg A 216.239.38.120"
local-data: "www.google.sh A 216.239.38.120"
local-data: "www.google.si A 216.239.38.120"
local-data: "www.google.sk A 216.239.38.120"
local-data: "www.google.com.sl A 216.239.38.120"
local-data: "www.google.sn A 216.239.38.120"
local-data: "www.google.so A 216.239.38.120"
local-data: "www.google.sm A 216.239.38.120"
local-data: "www.google.sr A 216.239.38.120"
local-data: "www.google.st A 216.239.38.120"
local-data: "www.google.com.sv A 216.239.38.120"
local-data: "www.google.td A 216.239.38.120"
local-data: "www.google.tg A 216.239.38.120"
local-data: "www.google.co.th A 216.239.38.120"
local-data: "www.google.com.tj A 216.239.38.120"
local-data: "www.google.tk A 216.239.38.120"
local-data: "www.google.tl A 216.239.38.120"
local-data: "www.google.tm A 216.239.38.120"
local-data: "www.google.tn A 216.239.38.120"
local-data: "www.google.to A 216.239.38.120"
local-data: "www.google.com.tr A 216.239.38.120"
local-data: "www.google.tt A 216.239.38.120"
local-data: "www.google.com.tw A 216.239.38.120"
local-data: "www.google.co.tz A 216.239.38.120"
local-data: "www.google.com.ua A 216.239.38.120"
local-data: "www.google.co.ug A 216.239.38.120"
local-data: "www.google.co.uk A 216.239.38.120"
local-data: "www.google.com.uy A 216.239.38.120"
local-data: "www.google.co.uz A 216.239.38.120"
local-data: "www.google.com.vc A 216.239.38.120"
local-data: "www.google.co.ve A 216.239.38.120"
local-data: "www.google.vg A 216.239.38.120"
local-data: "www.google.co.vi A 216.239.38.120"
local-data: "www.google.com.vn A 216.239.38.120"
local-data: "www.google.vu A 216.239.38.120"
local-data: "www.google.ws A 216.239.38.120"
local-data: "www.google.rs A 216.239.38.120"
local-data: "www.google.co.za A 216.239.38.120"
local-data: "www.google.co.zm A 216.239.38.120"
local-data: "www.google.co.zw A 216.239.38.120"
local-data: "www.google.cat A 216.239.38.120"
With a click on Save we save the file.
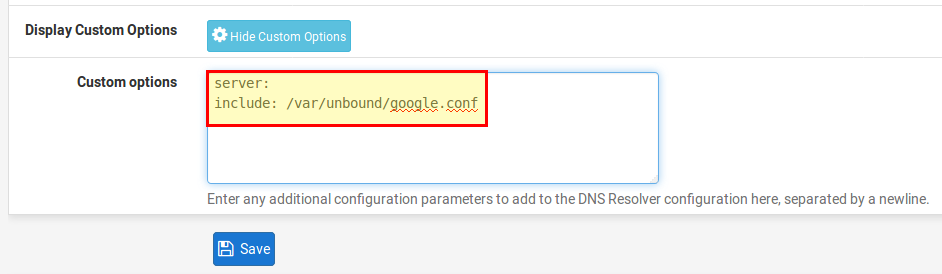
The last step is to tell our DNS server where to find these DNS records. To do this, open the DNS server settings under Services → DNS Resolver and click on Display Custom Options. There we insert the following lines, save them with Save and apply the changes with Apply.
server:
include: /var/unbound/google.conf
Our search engines are configured. The next step is to set up the content filter for HTTP and the URL filter for HTTPS.
Squid Proxy and SquidGuard
Installation
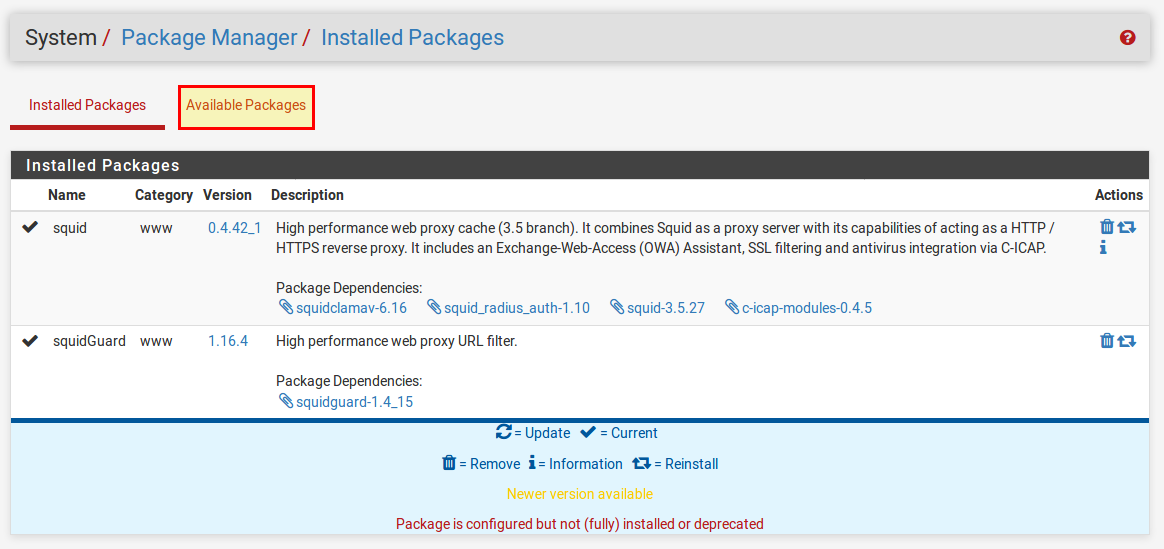
To enable pfSense to filter the URLs, we need a proxy server through which all requests from our network are routed. For this we use Squid. As the name suggests, SquidGuard is the actual filter. Under System → Package Manager in the Available Packages tab we install Squid and SquidGuard.
Setting Up Transparent Proxy for HTTP
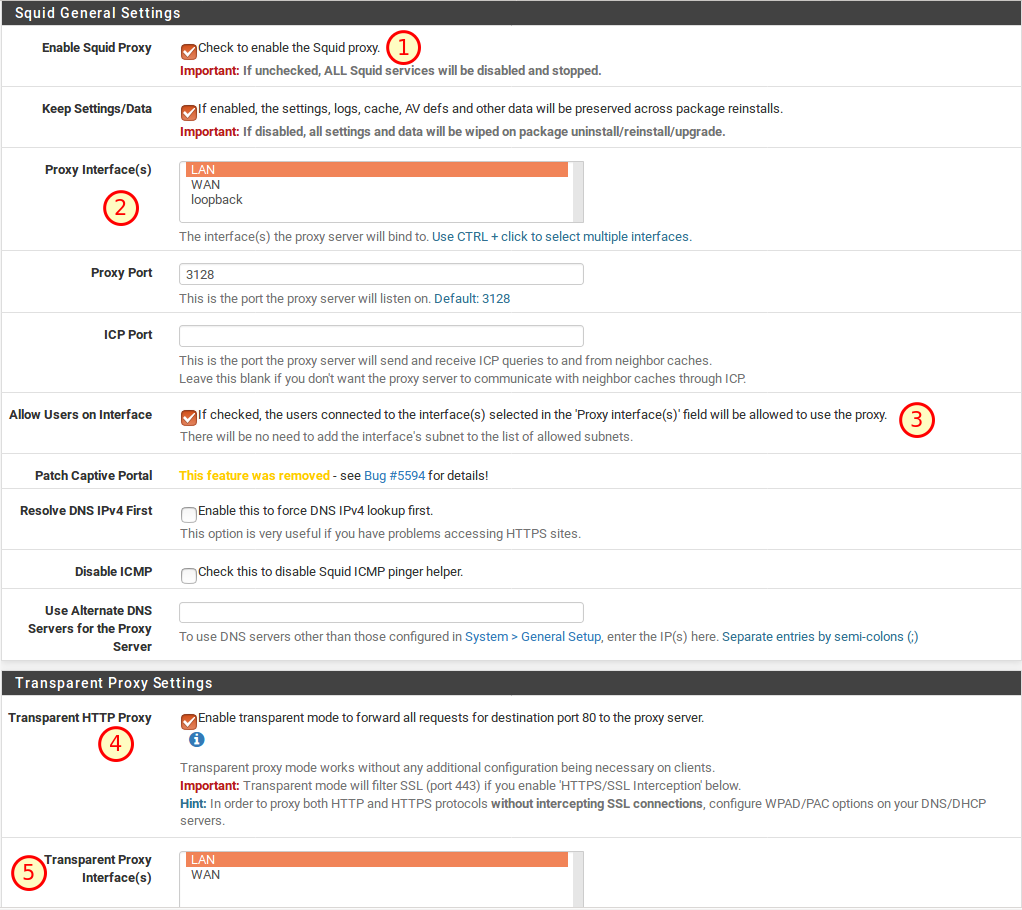
Under Services → Squid Proxy Server we now set up the transparent proxy for HTTP. A transparent proxy has the advantage that we do not have to configure any settings on the individual computers in our network. In the General tab we activate the following items:
- Enable Squid Proxy ✔
- Proxy Interface (s): LAN
- Allow users on interface ✔
- Transparent HTTP Proxy ✔
- Transparent Proxy Interface (s): LAN
After saving with Save we determine in the tab Local Cache how much disk space should be used for the cache (here 500MB):
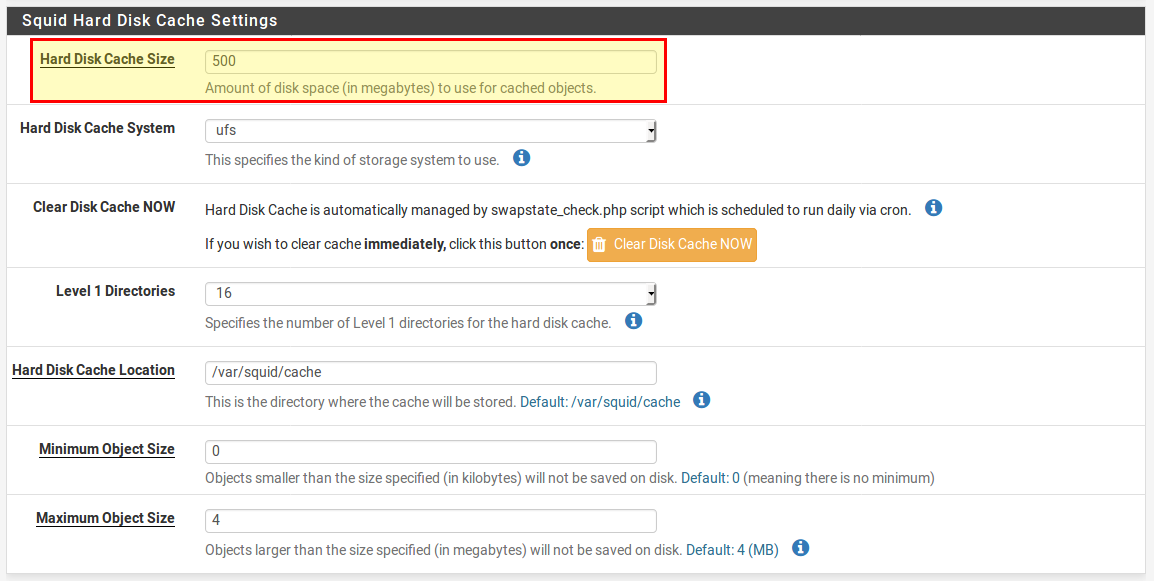
The settings have to be saved again with Save. The transparent proxy for HTTP connections is now set up.
Configuring SquidGuard
SquidGuard is the component responsible for filtering the content. Each request is examined by SquidGuard and then decided whether or not to block the request or the website. For this we use a blacklist, which we configure later. Before that, we’ll define some general settings under Services → SquidGuard Proxy Filter.
- Enable ✔
- (not shown in the screenshot)
- Enable Log ✔
- Enable log rotation ✔
- Enable Blacklist ✔
- Blacklist URL: http://www.shallalist.de/Downloads/shallalist.tar.gz
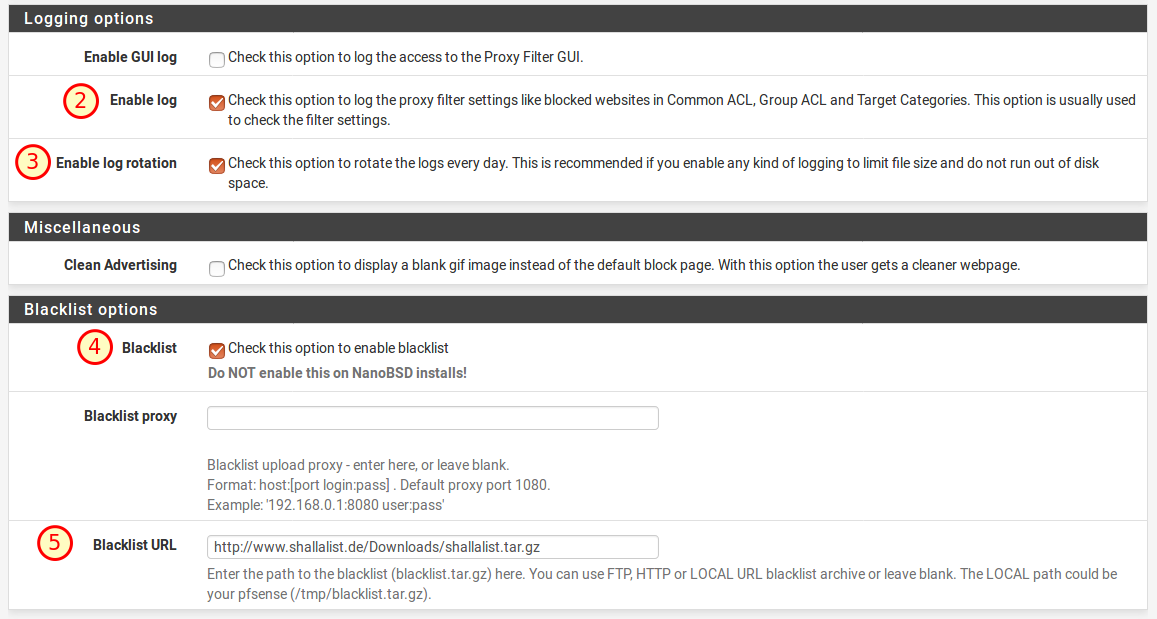
Below we save everything again with Save.
With the SquidGuard we have to keep in mind that changes in the configuration only become active after we have clicked Save and Apply (above in the General Settings tab)!
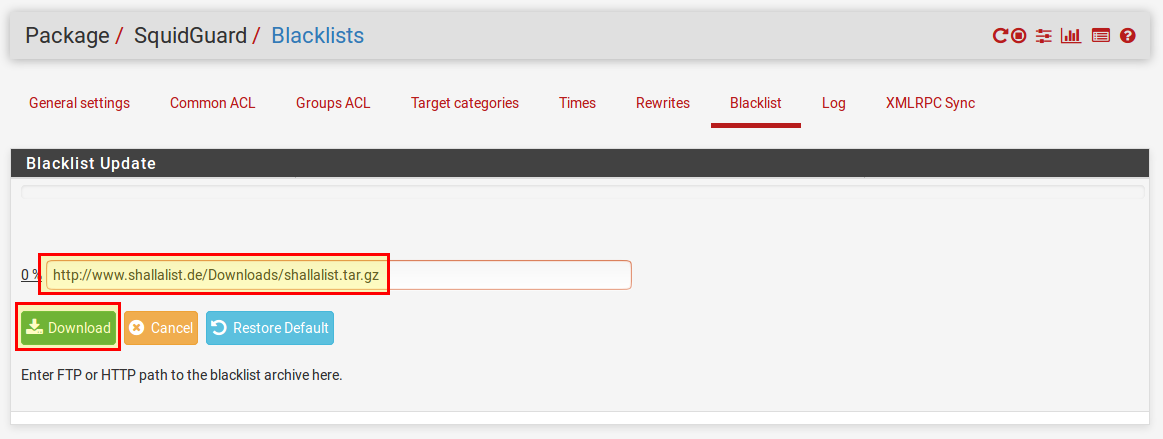
Setting up blacklists and whitelists
Now that we are done with the basic settings, the blacklists and whitelists are missing. The URL for the blacklist is already given. Now we have to download them in the tab “Blacklist“.
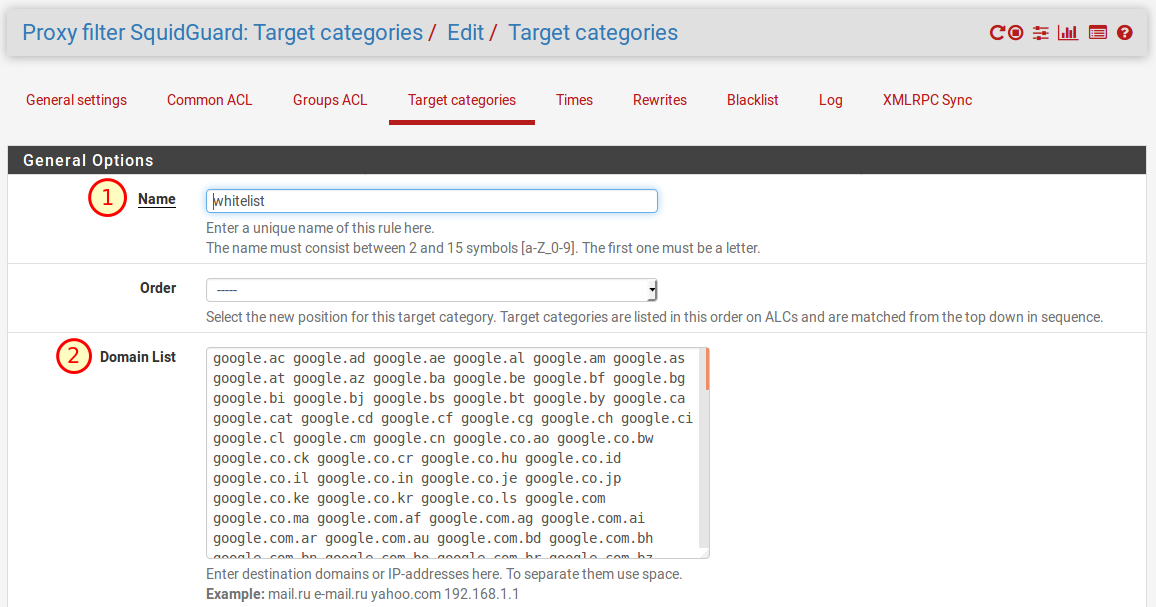
In order to make sure that our filter works, we are now defining several target categories. To do so, open the tab “Target Categories” and click on Add. We create a whitelist of all domain names we explicitly allow. That would be e. g. all Google domains, because we will block all other search engines in order to prevent the user from bypassing the Safe-Search feature set up above.
We will enter the following:
- Name: Whitelist
- Domain List:
google.ac google.ad google.ae google.al google.am google.as google.at google.az google.ba google.be google.bf google.bg google.bi google.bj google.bs google.bt google.by google.ca google.cat google.cd google.cf google.cg google.ch google.ci google.cl google.cm google.cn google.co.ao google.co.bw google.co.ck google.co.cr google.co.hu google.co.id google.co.il google.co.in google.co.je google.co.jp google.co.ke google.co.kr google.co.ls google.com google.co.ma google.com.af google.com.ag google.com.ai google.com.ar google.com.au google.com.bd google.com.bh google.com.bn google.com.bo google.com.br google.com.bz google.com.co google.com.cu google.com.cy google.com.do google.com.ec google.com.eg google.com.et google.com.fj google.com.gh google.com.gi google.com.gr google.com.gt google.com.hk google.com.jm google.com.kh google.com.kw google.com.lb google.com.ly google.com.mm google.com.mt google.com.mx google.com.my google.com.na google.com.nf google.com.ng google.com.ni google.com.np google.com.om google.com.pa google.com.pe google.com.pg google.com.ph google.com.pk google.com.pr google.com.py google.com.qa google.com.sa google.com.sb google.com.sg google.com.sl google.com.sv google.com.tj google.com.tr google.com.tw google.com.ua google.com.uy google.com.vc google.com.vn google.co.mz google.co.nz google.co.th google.co.tz google.co.ug google.co.uk google.co.uz google.co.ve google.co.vi google.co.za google.co.zm google.co.zw google.cv google.cz google.de google-directory.co.uk google.dj google.dk google.dm google.dz google.ee google.es google.fi google.fm google.fr google.ga google.ge google.gg google.gl google.gm google.gp google.gr google.gy google.hn google.hr google.ht google.hu google.ie google.im google.iq google.is google.it google.je google.jo google.kg google.ki google.kz google.la google.li google.lk google.lt google.lu google.lv google.md google.me google.mg google.mk google.ml google.mn google.ms google.mu google.mv google.mw google.ne google.nl google.no google.nr google.nu google.off.ai googlepirate.com google.pl google.pn google.ps google.pt google.ro google.rs google.ru google.rw google.sc google.se google.sh google.si google.sk google.sm google.sn google.so google.sr google.st google.td google.tg google.tk google.tl google.tm google.tn google.to google.tt google.uz google.vg google.vu google.ws bing.com
- Description: Whitelist
- Save with Save.
The last step for the time being is to establish some rules. We do this in the Common ACL tab. Then click on the “+” sign in “Target Rules List” to open a list of the different rule sets. There are now different categories and our whitelist appears here. We now make the following settings:
- Whitelist: access whitelist
- Default access [all]: access allow
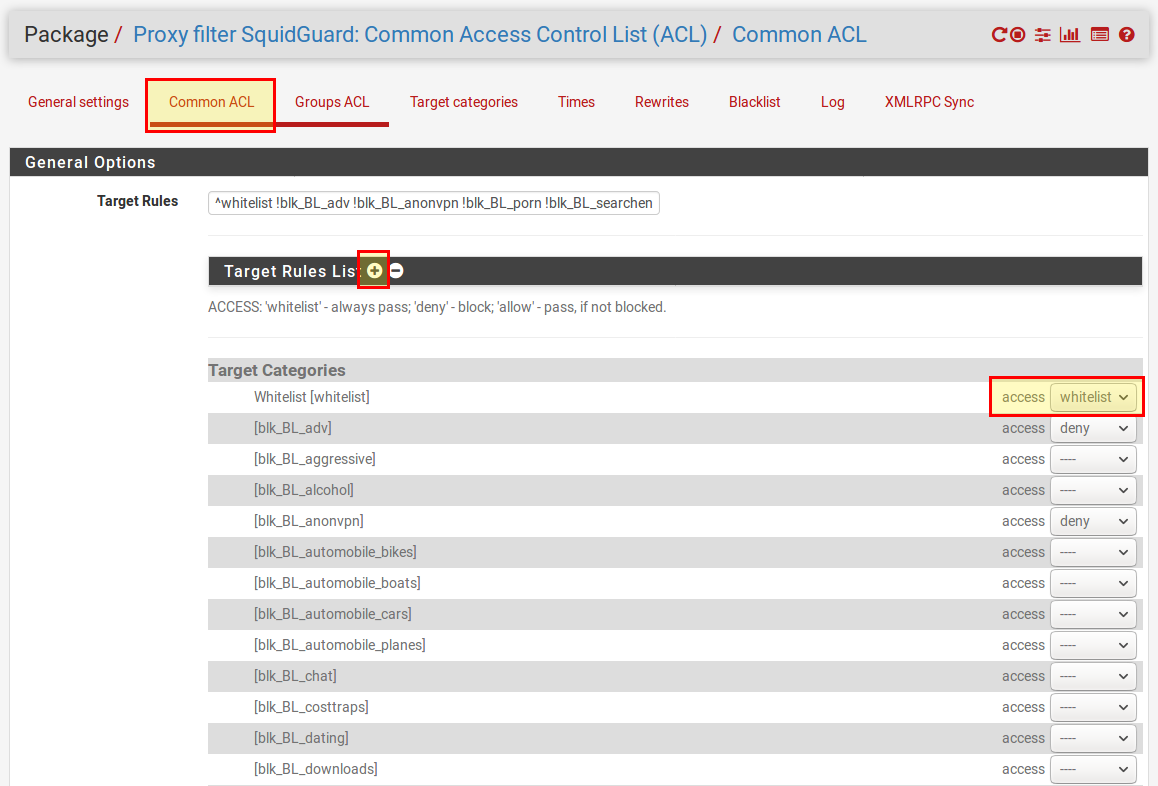
The other categories can be set as required. Here are some examples:
- Block advertising:[blk_BL_adv] access deny
- Block pornography:[blk_BL_porn] access deny
- etc.
To prevent a user from bypassing our URL filter by entering the IP address of a page, we still enable Do not allow IP addresses in URL. If this setting causes problems, you should deactivate it again.

Then we save with Save, switch to the General Settings tab and press Apply again to apply our changes.
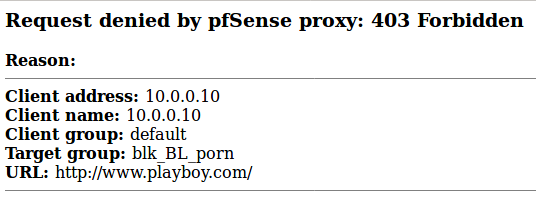
Test Setup
Everything is set up for HTTP connections and we can test the setup. Nothing else needs to be set up on a computer in the LAN. The filter should already work. If we visit a page that appears in one of our blacklists, this page will appear:
Transparent proxy for HTTPS connections
Up to now, the transparent proxy is only active for HTTP, i. e. unencrypted requests. At the beginning of this article I already pointed out the difficulties in filtering encrypted, i. e. HTTPS connections. In our case, we will activate a transparent proxy for HTTPS, which allows us to enable a URL filter for all requests on port 443 (HTTPS), but with the disadvantage that we cannot (and don’t want to!) analyze the content and we can’t do a nice error page. Instead, the browser will display a certificate error message. But more on this soon.
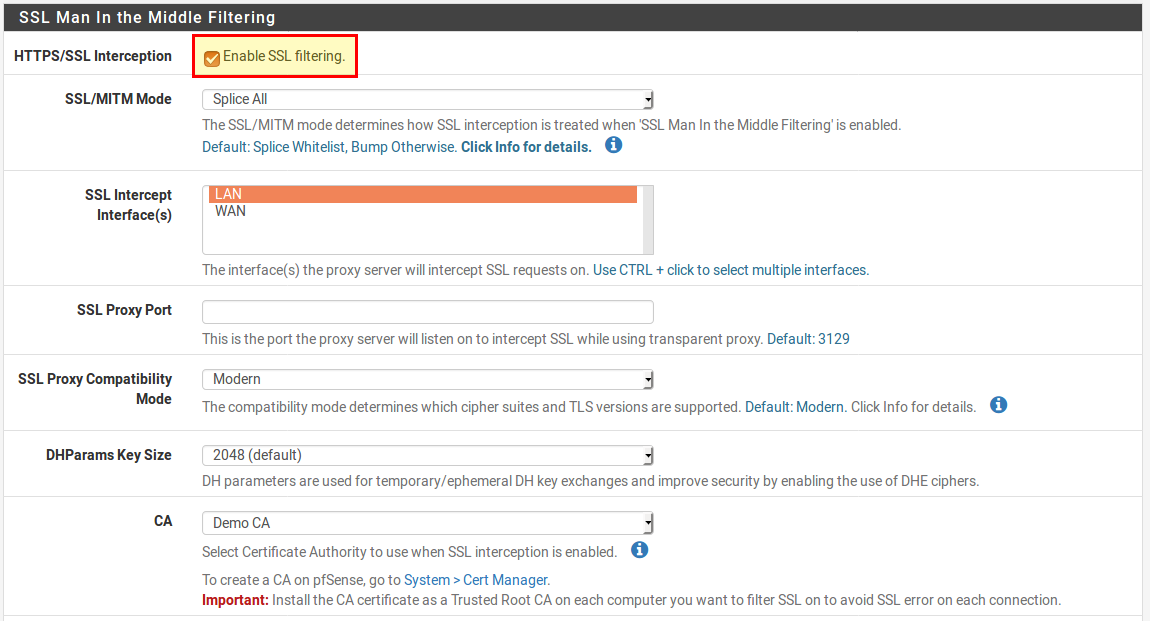
First we activate the transparent proxy for HTTPS. To do this, open the proxy settings under Services → Squid Proxy Server and select the following settings in the SSL Man in the Middle Filtering section:
- HTTPS / SSL Interception ✔
- SSL/MITM Method: Splice All
- SSL Intercept Interfaces: LAN
- CA: Select a Certificate Authority Certificate. Maybe we’ll have to create one first. (under System → Cert. Manager).
- Save all with Save.
Now everything is set up and we can also test HTTPS connections. As already written, this time we don’t get an informative error message like for HTTP connections, but a warning from the browser:
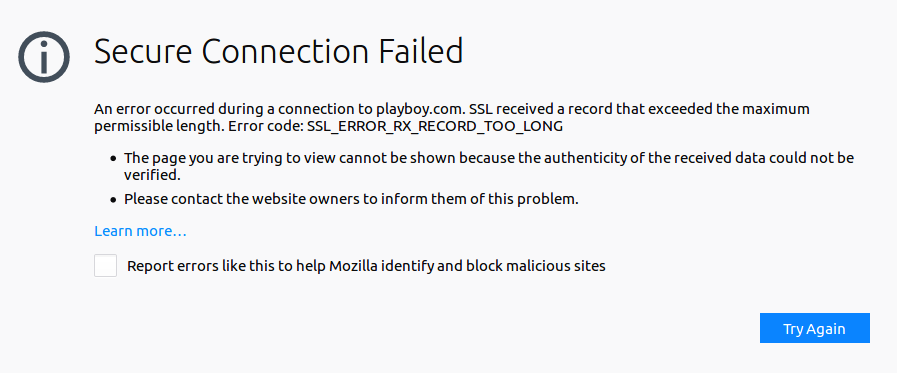
Even though this error message is not very meaningful, we have achieved our real goal of blocking unwanted pages.
Conclusion
We have now set up a system that filters all network traffic in our LAN (or WLAN). This blocks pages that have been defined using the blacklists.
The pros and cons of such locks have different positions. In any case, it is a problem that cannot and should not be solved 100% technically, since it is rather a question of educating (young) people to be able to deal responsibly with the medium “Internet”. It is certainly not the right way to achieve this goal by means of such filtering alone. The fact that children and young people are “accustomed” to censorship and filtering is also viewed critically by some.
On the other hand, it is especially helpful for schools, libraries or at home if you can limit the amount of non-appropiate content. Some countries also prescribe such a filter by law!
(Source: https://forum.pfsense.org/index.php?topic=112335.0)


19 Comments
craig · March 31, 2018 at 12:07 am
Hi, Thanks for your good work. We went through your process and had great success! However, we are not able to block google mail mail services. Any insight?
Stephan · April 5, 2018 at 11:42 am
@Craig: I think its because all the Google Domains are in the white list. Do you want to block the domain or also the Google Mail App on smartphones?
Martin · April 19, 2018 at 1:09 am
Excellent!
Greta · April 19, 2018 at 7:33 pm
Hi Steph, i found this tutorial very interesting, it reminded me of a special methodology used by our company named La Rache : https://www.la-rache.com/
Basil · April 20, 2018 at 6:41 pm
Hello
It is really one of the most benifical tutorial I have ever read
I will deploy this hope to success like you.
Basil · April 20, 2018 at 6:46 pm
But does all https traffic being blocked 🙁 ? even the needed sites like facebook and hotmail etc..
Stephan · April 21, 2018 at 7:23 am
@Basil: No, just the ones, that are in the blacklist.
vinay · April 25, 2018 at 11:19 am
really awesome work. I really appreciate your efforts. Please do updating. i want to follow you. Kindly provide your FB or twitter ID..
Stephan · April 25, 2018 at 2:28 pm
Check the sidebar.
Lloyd Sommerer · May 3, 2018 at 4:57 am
Thnk you. This hsa been most helpful in setting up safe search at my school. One note, there is an extra space after the period that might throw someone off:
server:
include: /var/unbound/google. conf
Stephan · May 5, 2018 at 7:08 am
Thanks! I’ll fix it.
Seth · May 3, 2018 at 4:37 pm
Hi Stephan! I tried this setup but other https websites are blocked why is that though when I enable SSL Filtering on Squid Proxy Server. How you can help!
Stephan · May 5, 2018 at 7:07 am
Maybe the other https Websites are in the blacklist? You can whitelist them like the google domains.
Adam · May 14, 2018 at 9:28 pm
Much like Seth, all https traffic appears to be blocked in this configuration for me as well. I have my sites whitelisted but to no avail in https. It works fine with http though. Any ideas?
With that being said, My state’s laws says schools MUST filter traffic in schools. Furthermore, the school owns all traffic in the network as it is guided by a legal AUP. I am not sure how other states do this but it is legal to do the conscious MIM attack for our purposes. I do side where conscious MIM attacks could be a security breach, keeping kids safe is also an important role as well. My school already has a commercial system that does this in fact. While I am not trying to open a debate on this at all, I am merely trying to lockdown my students internet during testing times to curb the possibility of cheating. We use Cisco Netacad for this which is on amazon AWS. There are many URL’s and writing a simple router ACL would be a pain due to the complexity of our setup. Any input/guides on the Conscious MIM setup?
Klaus · May 10, 2018 at 10:18 am
Hi, i filter the https all right but when i try access to youtube enter but filter the content and i not filter safesearch, i create user exclude of the filter in the proxy but same i can’t access to the content on youtube.
Aaron Wagner · May 12, 2018 at 6:53 am
We used WPAD to configure the proxy settings on the PCs. Tbis allowed us to filter https sites without MITM.
The http://www.shallalist.de site seems to be down right now.
Keith Winn · May 14, 2018 at 7:24 am
You are the man!!! This is awesome. Just did this to my firewall at my school and I love it. It will save me a lot of money as I was looking at several DNS services to solve this problem. This will save me some $$$ and be one less extra service that I have to manage. By the way, I like your other posts too. Keep up the good work.
It did not work the first time, I had to restart all the proxy services, but after that it is working like a charm. Thanks again.
PfSense Web Filter With pfBlockerNG - Filter Ads and Malicious Websites | Open School Solutions · October 22, 2020 at 10:11 pm
[…] and for each browser separately. Therefore, I would like to describe how you can build a pfSense web filter with pfBlockerNG to filter advertising, unwanted content and malicious websites network-wide. This […]
Web Filtering as a Service on pfSense – Nasir Hafeez · December 26, 2020 at 2:22 pm
[…] https://openschoolsolutions.org/pfsense-web-filter-filter-https-squidguard/ […]